CLICK HERE FOR FREE BLOGGER TEMPLATES, LINK BUTTONS AND MORE! »

Saturday, October 31, 2009

Happy Halloween!


Aren't these tall bags cute! I made them for my nieces for Halloween. I kinda went overboard on the goodies to put inside and needed something tall. This size was perfect! I made the smaller Fancy Favor Boxes for my guys ... 16 & 21 ... this size was the perfect for a couple of gift cards and a few of treat size chocolate bars! I got a "Thanks, Mom" ... and a hug!


Supplies: All SU unless noted: Tall Bags: Stamps: Non SU Halloween set by Inkadinkado, Teeny Tiny Wishes; Cardstock: Pumpkin Pie, Basic Black, Elegant Eggplant, Whisper White;DSP: Ghostly Greetings(Retired), Cast-A-Spell; Ink: Basic Black, Markers: Soft Suede, Rich Razzleberry, Dusty Durango; Ribbon: Striped GrosGrain Fancy Favor Box: Stamps: From the Crypt, Teeny Tiny Wishes Ink: Basic Black; Cardstock Basic Black, Whisper White, Pumpkin Pie, Old Olive

We had 143 little Trick or Treaters tonight ... a quiet Halloween this year as we usually get closer to 200!


Tuesday, October 27, 2009

Becky's Milk Carton Containers


It's my dear friend Gerrie's Birthday and I love making her little things 'cause she loves and appreciates getting them. So, since I've been wanting to make Becky's Milk Carton Containers for quite some time it seemed the perfect little gift for Gerrie.
This is an all Stampin' Up! project including the ribbon...don't recognize it? Well, I didn't have any Elegant Eggplant ribbon of any size to match the project but I did have twill, and an Elegant Eggplant Classic Reinker so, I thought I'd try and dye some. I mixed about 10 drops of reinker with some tap water in a little plastic container, added the twill and stirred it around for a few minutes, making sure the entire surface had absorbed color. I blotted in on paper towel then heat set it with a dry iron. If you do this remember to sandwich the ribbon in some sort of press cloth, I used an old piece of flannel. I think it looks great! I filled the little containers with some fun little things ... but that's a secret!

Friday, October 23, 2009

October Club Projects


Supplies: Stamps: Sweet Season Ink: Real Red Craft ink, Soft Suede Classic Ink Cardstock: Base Card: Soft Suede Layers: Real Red Embossed with Petals-A-Plenty Impression Folder then cut to 4”x5¼”, Whisper White 4”x 2½”, Soft Suede, whisper white and Real Red Embossed scraps for stamping and punches. Designer Series Paper(DSP): Christmas Cocoa Specialty DSP (Holiday Mini) 4”x1¼”;Tools: Big Shot and Petals-a-plenty Impressions Folder, Heat Tool, Paper Piercer and Mat Pack, Bone Folder, Embossing Buddy, Punches: Scallop Circle, 1⅜” circle punch, 1¼” circle punch,Stamp-a-ma-jig.Ribbon: Soft Suede Grosgrain, Real Red Narrow Grosgrain Other: Clear Embossing Powder, Adhesives: Snail & Dimensionals, 3 silver brads

'Just wanted to highlight the cards and 3D we made this month in my Stamper's 8 Club...we focused on adding that WOW factor. The girls got to try their hand at heat embossing in this little cutie completely CASEd from this card by Diana Gibb.

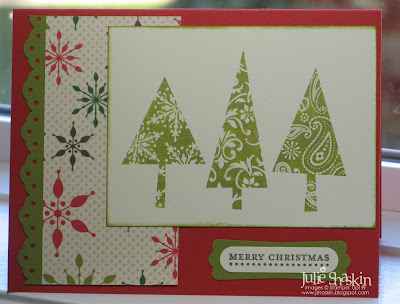
Supplies: Stamps: Patterned Pines (Hostess Level 1-Holiday Mini catalogue); Sentiment from Teeny Tiny Wishes Ink: Chocolate chip Classic, Old Olive Classic Ink for sponging and Reinker & Champagne Mist Shimmer Paint for stamping. Cardstock: Base card: Real Red Layer: Very Vanilla( 3”x4”), Old Olive ( 4”x 2”)Scraps: Very Vanilla, Old Olive Designer Series Paper (DSP): Merry Moments (Multi color snowflakes)(4”x2”)Tools: Punches: Word Window, Designer Label, Eyelet Border Punch Other: Dotto, Sponge Daubers, Baby Wipes to clean stamp before cleaning on Stampin Scrubber, Adhesives: Snail & dimensionals

We used SU's new product, Shimmer Paint, mixed with Old Olive Classic reinker for this second card to give these folky trees a bit of bling! I have Andrea Walford and Jen Sannes to thank for the inspiration behind this quick and easy Christmas Greeting!

Finally, it's too close to Halloween not to include a spooky 3D treat! These 'sour cream containers' are so fun to use for so many occasions.We used Cast-a-Spell DSP and a variety of Halloween stamps, this one used From the Crypt.
It was great fun as always!

Wednesday, October 7, 2009

I Love This Punch!

I had some time last night to play! I purchased a great card tutorial by Sandi MacIver and this is a card I made using one of her clever ideas! Recipe:
Stamps: Circle Circus, Best Yet (retired)
Paper: Cardstock: Real Red, Whisper White, Brushed Gold DSP: Christmas Cocoa Specialty (Holiday Mini)
Ink: Stazon Black, Versamark
Ribbon: Mistletoe, Gold Elastic Cord (Holiday Mini)
Tools: Ornament Punch
Other: White Embossing Powder, Snail, Mini Glue Dots, Dimensionals

Saturday, October 3, 2009

Christmas Countdown!


Won't the countdown to Christmas be fun with this Cookie Sheet Advent Calendar! Fill each tin with a sweet surprise sure to bring a smile.
Join me in making this 'too cute' Christmas Project--makes a great gift or keep it for yourself! Class fee includes all supplies, use of stamps, punches and instruction. You will have Designer Series Paper left over for other Christmas Projects! Please bring your own supply of adhesive.

When: Tues. Nov. 10, 2009 7-10pm
Cost: $65+gst
Registration Deadline: Tues. Oct. 27, 2009 Registration limited to 8...and is filling quickly! Payment in FULL by cash or cheque required by deadline please.